
WORLD of Warcraft’s next big expansion, Dragonflight, is coming before the end of the year and will bring big changes to the gameplay.
One of the key changes is the revamped talent tree system which has been long awaited by fans.
The new layout for class trees.
There are two active talent trees in the upcoming expansion: one which defines your overall class, and one which focuses on your speciality.
Alongside the trees there are three types of nodes. Square nodes are actions, circular nodes are passive, and octagonal nodes make you choose between two abilities.
Here’s how to assign your skill points in Dragonflight’s latest system to help you build the character you want.
Hunter Class Tree
‘Kill Command’ will be given to you as the default skill on the main Hunter tree if you choose to specialise in Beast Mastery or Survival.
‘Kill Shot’ will be your default if you choose Marksmanship, but should be selected first even if you chose one of the other two specialties.
This will take out those under 20% health, and when combined with ‘Improved Kill Shot’ expands it to those below 25%.
Two choices will give boosts to your health depending on whether you or your pet like to enter battle more.
‘Improved Mend Pet’ increases your pet’s healing and can even remove harmful effects, while ‘Natural Mending’ will up the amount you self-heal.
‘Survival of the Fittest’ can be another option for those who want to stay on the field, by reducing damage taken by 20%.
‘Tar Trap’ is another option here as it slows down enemies as they get closer to you, making a great escape tactic if you are ambushed.
Your first node gives you a choice to make to improve the ‘Survival of the Fittest’ skill.
‘Lone Survivor’ is our choice here as it reduces the cooldown by 30 seconds and extends the duration by two.
While the extra 20% boost that Nature’s Endurance gives is appealing, the extra time spent defending is vital.
Other options for keeping your health are ‘Camouflage’ which will help you sneak past enemies and let you and your pet regain 2% health every second for a minute, as well as ‘Rejuvenating Wind’ which increases healing by 10% every eight seconds.
As we move further up the talent tree you have to choose between taking the path to the left or right.
We recommend the left path for defensive players, which adds ‘Intimidate’, allowing your pet to stun targets, then ‘Binding Shackles’ and on to ‘Beast Master’, which will increase your pet’s damage.
Finally you will reach ‘Improved Kill Command’ and the bottom choice node for ‘Alpha Predator’.
The right side offers more offensive abilities such as ‘Born to be Wild’, which reduces cooldown on certain aspects by 10% per point, and ‘Sentinel’, a great ability for attacking all targets in an area ignoring line of sight for up to 12 seconds.
‘Master Marksman’ and ‘Serpent Sting’ add bleed and poison effects giving damage over time.
Finally, you can choose between ‘Latent Poison Injectors’ or ‘Hydra’s bite’ – the latter is the preferred option as it fires two additional arrows at foes.
Beast Mastery Tree
Where to put your points in Beast Mastery.
Beast Mastery is a good choice of specialisation as your pet will do most of the attacking for you.
The one downside is that if your pet dies, you will quickly end up in trouble so it’s good to make sure your build is based on keeping your good boy healthy.
‘Barbed Shot’ is your bread and butter here, while ‘Pack Tactics’ enhances Focus regeneration and ‘Loaded Quiver’ will give you a second charge at ‘Barbed Shot’.
The tree splits here. The left side offers ‘Animal Companion’ which will summon a second pet for additional damage.
‘Bestial Wrath’ helps with this by increasing damage both you and your pet deal for several seconds.
‘Aspect of the Wild’ also works well with this by increasing critical hits and allowing you access to ‘Barbed Wrath’, which reduces the cooldown on ‘Bestial Wrath’ by several seconds.
‘Call of the Wild’ summons two active pets and one from your stable for several seconds, and allows access to ‘Bloody Frenzy’, which offers the effects of ‘Barbed Shot’ to all active pets.
The other option is to go down the Dire Pet Tree, which gives vastly different skills depending on the path you take.
‘Dire Beast’ summons a wild animal while increasing your haste and only has a 20 second cooldown.
‘Dire Command’ synergises well with this, giving a chance to summon a beast every time you use ‘Kill Command’.
‘Pack Resilience’ will also add one second to the time your beasts are on the field.
Most important though is ‘Dire Pack’, which resets the cooldown of Kill Command while reducing focus cost.
If built correctly, you can then spam ‘Kill Command’ and if you choose ‘In for the Kill’, there is also the chance to use ‘Kill Shot’ on an enemy regardless of health.
Marksmanship
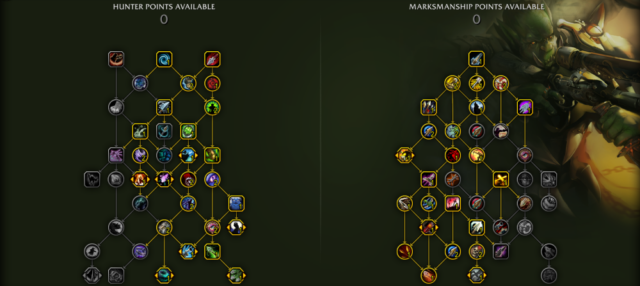 The best skills for Marksmanship
This is one of the more difficult skills to level up with its limited capabilities, but can be good in group content.
Marksmanship offers more traps, such as ‘Hi-Explosive Trap’ or ‘Improved Traps’.
‘Binding Shot’ is another interesting talent that places an anchor and anyone in range gets stunned if they walk too far away.
‘Sentinel’ is also available here, and the follow up ‘Sentinel’s Perception’ will make the ability available to all your party members.
‘Barrage’ will add additional single-target damage, and ‘Death Chakram’ deals damage and applies a defence down debuff.
Those who want to focus on Area of Effect attacks should go for the ‘Lone Wolf’ skill, which increases damage by 10% when your pet is inactive.
‘Chimera Shot’ will hit a second target close to your main target and works well with ‘Rapid Fire’ and ‘Multi-Shot’.
‘Trick Shots’ also plays into these advantages by applying a buff when you hit three or more targets.
‘Bombardment’ further synergises by automatically applying ‘Trick Shots’ after you use ‘Chimera Shot’ four times.
The node choice is up to you. ‘Heavy Ammo’ hits two fewer targets but increases ricochet damage.
‘Light Ammo’ will increase your ricochet by up to two extra enemies.
‘Volley’ will call down a storm of arrows which deals damage to enemies for 6 seconds and also applies the ‘Trick Shots’ buff.
‘Trueshot’ increases focus region rates and reduces cooldown for other shots.
Add ‘Eagleton’s True Focus’ into the mix to increase the duration of ‘Trueshot’ and decrease other focus costs.
For those who want to focus on single targets, ‘Double Tap’ will make your ‘Aimed Shot’ automatically fire at 100% without consuming focus.
‘Serpentstalker’s Trickery’ will add additional damage to your ‘Aimed Shot’, while ‘Lock and Load’ makes your auto attacks have an 8% chance of using an extra ‘Aimed Shot’.
‘Legacy of the Windrunners’ adds six extra wind arrows to your ‘Aimed Shot’, and ‘Windrunner’s Guidance’ will increase the chance of those arrows landing a critical hit.
Survival
 How to make the best survival build
Survival players are melee-focused and will use a spear to deal damage alongside their pet.
This means that a lot of the Beast Mastery talents apply here, and work well with a few important talents to maximise your build.
‘Wildfire Bomb’ is one of the more fun abilities which has a great Survivor build. It deals damage over time and works well with ‘Kill Command’.
‘Guerilla Tactics’ will give you an additional charge for your bomb, and ‘Improved Wildfire Bomb’ increases its damage.
‘Coordinated Assault’ increases the damage of ‘Wildfire Bomb’ and adds bleed effect to ‘Killshot’.
‘Explosive Expert’ also works well by reducing the cooldown on the bomb.
‘Wildfire Infusion’ is the last talent we recommend, which gives you bombs different infusions.
‘Shrapnel Bomb’ causes bleed, ‘Pheromone Bomb’ enhances Kill Command, and ‘Volatile Bomb’ adds poison to multiple targets.
If you would rather focus on your spear, then look to the right side of the talent tree.
‘Harpoon’ brings you towards your target to close the melee gap and ‘Terms of Engagement’ decreases the cooldown on it, reduces damage taken, increases focus, and resets ‘Harpoon’ when you defeat an enemy.
‘Mongoose Bite’ replaces ‘Raptor Strike’ but also gives you the ‘Mongoose Fury’ buff which deals bonus damage.
‘Spear Focus’ works well with this by upping the damage of the bite alongside ‘Sweeping Spear’.
‘Bloody Claws’ increases the chance that ‘Kill Command’ resets for every stack of ‘Mongoose Fury’.
‘Spearhead’ will further synergise with this by upping damage of pet attacks and ‘Kill Command’.
‘Deadly Duo’ is the last piece of the puzzle, decreasing ‘Mongoose Bite’s focus cost, resetting ‘Kill Command’ and extending the duration of ‘Spearhead’.
While the power of these synergises may change over time, the utility of these abilities will be key to whichever build you land on.
Written by Georgina Young on behalf of GLHF.


